


IMPORTANCE OF EXTERNAL WALL INSULATION
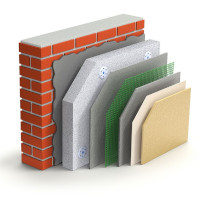 External wall insulation, also known as EWI is a type of insulation that is attached to the outside of your walls in order to improve the insulating properties of the building. EWI creates a barrier that stops heat escaping through your walls. This barrier is attached to the outside of your walls in several layers. The main insulating component is normally made of expanded polystyrene (EPS), phenolic boards or mineral wool. EPS is most commonly used.
The key benefit of isolating a house using external wall insulation is the installation process itself, which does not interfere with the occupants' daily life in any way. This means that scaffolding is built outside, and all work is carried out externally. Additionally, the insulation is fitted on the exterior of the walls – installing insulation on the interior would decrease the usable space and room sizes.
The importance of external wall insulation increases the more money it can save us on heating bills. By installing EWI on the exterior of the building, we create an external layer that prevents the escape of warm air, resulting in savings of around 20-30%. Installing EWI will add around 100mm to your house, depending on the thickness of insulation used.
Picture credit:foveotec
11✔ STEPS TO TAKE BEFORE EXTERNAL WALL INSULATION INSTALLATION
It is always recommended that the following is undertaken prior to the application of an EWI system:
Check for rising damp and the causes
Check for existing movement joints and make provision to reflect this in the new installation
Check for efflorescence (lime bloom) or if similar problems have been treated and remedied that the masonry has dried out sufficiently
Test the walls for any defects
Test the existing substrate for pull out loads so that fixing type and quantities can be determined
Carry out a line and level survey to determine if a dubbing out or levelling coat is required
Remove moss, lichen, mould, and treat with an anti-fungicidal wash if required
Identify any unusual detailing issues
Determine if any architectural features need preserving or re replicating in order to be repositioned and placed within / on the new EWI system
Evaluate access to the property, heights of the building and security of tenants
Discuss finishes, colours and textures with the client / interested parties
CAN YOU INSTALL EXTERNAL INSULATION YOURSELF? l DIY WALL INSULATION
Many of our clients ask us whether they can install external wall insulation themselves. The answer to this question largely depends on the manual skills they have.
If you're familiar with using basic tools such as a drill, trowel, spirit level, or scraper, then you can confidently decide to install EWI yourself.
It's not exceptionally difficult, and by adhering to basic principles, you can save a significant amount of money on the installation alone. Remember that besides your skills, you'll also need to rent scaffolding, have time, and rely on good weather, which can be quite challenging in the UK!
WHICH WAY DOES INSULATION GO IN AN OUTSIDE WALL?
If you're considering DIY installation of EWI, keep in mind the orientation for attaching insulation boards. Applying external wall insulation boards follows a similar principle to the "brick system" used in brick wall construction. Thus, boards should be placed horizontally and alternated, with corners requiring overlapping joints.
EPS polystyrene boards either white or grey are identical on both sides, so it doesn't matter which side you attach to the external wall. However, when using Rockwool DD boards, which consist of a dual-layer of mineral wool, the soft layer should always be installed to the wall, while the rigid layer should receive the thin coat render. As for Kingspan K5 phenolic boards, you'll notice that one side is covered with white tissue, which should be visible after attaching them to the wall. Therefore, when installing Kingspan K5 boards, remember that the white side should face outward and be covered with thin coat render.
EXTERNAL WALL INSULATION GRANTS
If you're planning to install external wall insulation, you should know that you most likely qualify for government grants. What does this mean? It means that a portion of the costs you incur may be refunded to you, depending on your individual life situation. So, it's worth trying, here is the link.
HOW TO INSTALL EXTERNAL WALL INSULATION: BEST PRACTICES FOR THE APPLIED PROCESS
BASE TRACK/STARTER PROFILE INSTALLATION
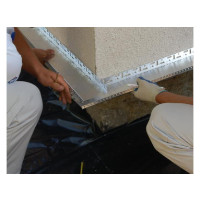
Specified starter track should be installed at existing DPC level, with specified fixings at correct centres. Starter tracks should be installed against a flat surface, with any gaps filled with expanding foam or silicone sealant, however it would be preferred to dub out the wall locally to ensure full contact with the wall and rear up stand of the trim. Trims are set 150mm above ground level to reduce the effects of ‘splash back’ of rainwater, dirt and other contaminants, however it is advised that DPCs should not be bridged.The width of the base track is selected based on the thickness of the insulation used. For instance, if you decide to use 100mm insulation, you will need a 100mm base track. Similarly, if you use insulation with a thickness of 50mm, you will require a 50mm base track.
The base tracks are mounted using plugs and screws. It is recommended to maintain a spacing between them of no more than 500mm. Remember that an excessive number of screws can cause deformation and distortion of the base track.
The base tracks are installed horizontally, and in internal corners, they are cut at a 45-degree angle to ensure a seamless fit. Similarly, they are mounted on external corners, where a triangle is cut off and folded to create continuity. It's best to avoid joints in the base track, but if necessary, base track connection clips should be used, with two clips required for each joint. Tin snips or metal shears are used to cut the base track. Base tracks are typically made of aluminium, so cutting them with an angle grinder at low speed is permissible.
The installation of the base track is the first and most crucial step. It should be carried out very precisely and in perfect alignment, as any mistake at this stage will compound errors in subsequent installation steps.
EXTERNAL WALL INSULATION BOARDS INSTALLATION
 Boarding works should only occur in dry conditions, and boards should be protected from adverse weather, direct sunlight and possible impact damage. Boards should be laid in a staggered pattern, and should be staggered at the edges of buildings so that they form a toothed finish. Generally boards should be cut in an L shape around the corners of openings, and small cuts of boards should not be allowed.
Minimum cuts will vary from system supplier, however it would be best practice to limit cuts to a minimum of 200mm. Gaps in boards should be limited, and should be filled with expanding foam. Boards should be level so that the basecoat and decorative finish are installed on a flat true surface. Levelling of boards can be undertaken with adhesive or dubbing out renders, and should be assessed at contract stage and allowed for within the contract costs.
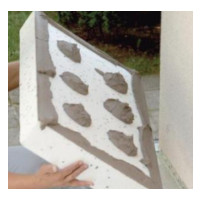
Adhesive should be applied to the rear of the board, and should follow either a dot and dab method, with renders to the board edges, or a fully applied adhesive using a trowel. This will be subject to the system designer’s recommendations.
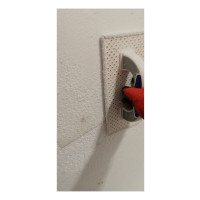
FIXINGS INSTALLATION
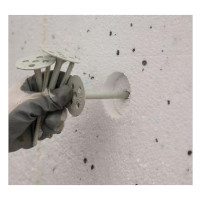 After mounting the EWI boards to the wall, it's necessary to wait 24 hours for the adhesive to dry before proceeding to attach the fixings. Both metal and plastic pin fixings serve the same purpose, reinforcing the attachment of the boards to the wall, which is particularly important at building corners and in high-rise buildings. Failure to use mounting fixings could result in the insulation layer being torn off by the wind.
Generally, plastic pin fixings are sufficient for attaching polystyrene insulation. However, for harder materials like Rockwool DD or Kingspan K5 phenolic boards, which require stronger attachment, metal pin fixings are recommended. Metal fixings should also be used for any insulation thicker than 150mm.
The installation of EWI fixings involves drilling 8-9 holes per square metre in both the insulation board and the wall. An 8 or 10mm drill bit is used for this purpose. Next, mounting holes are cut using a plastic router to ensure the fixings can fully penetrate the insulation and be subsequently covered by masking caps made of EPS. The use of masking caps prevents the appearance of visible fixing holes on the facade, especially when exposed to temperature changes.
Fixings should be selected based on the insulation thickness, with an additional 30-50mm allowance for securing in solid walls.
Masking dowel caps made of expanded polystyrene are attached using expanding foam. They are firmly pressed into the pre-drilled holes and secured tightly.
EXTERNAL INSULATION BOARDS SURFACE PREPARATION
 Once the insulation boards are secured with fixings, they are ready for the next step, which is surface levelling. This step can only be performed with polystyrene and Rockwool DD boards, as their surfaces allow for rasping. However, this step cannot be carried out when using phenolic boards made by Kingspan, as their boards are covered with white tissue. Because of that, it is important that you never rasp these boards! And because you can’t rasp them, it is important to get them really dead flat and level with each other.
Insulation boards surface levelling is straightforward and does not require excessive force. Using a grinder rasp tool makes the process relatively easy. Circular motions with the largest possible radius should be made to level the surface as much as possible. Once the surface is prepared, it is ready for the application of thin coat render.
BEADS AND TRIMS INSTALLATION
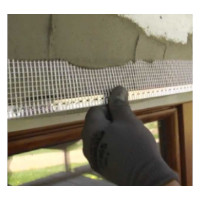 Before starting the thin coat render, it's essential to prepare all the building's corners and openings. They serve to reinforce corners vulnerable to mechanical damage and to achieve sharp shapes.
The most versatile option is a corner bead with mesh, which is embedded in adhesive and levelled vertically. For lintels, they should, of course, be levelled horizontally.
At this stage, it's also common to install the window sill extender, and we've covered its installation in a separate article, which you can find here.
Sills and flashings should be installed so that they provide sufficient overhang to shed water away from the face of the finished system. Best practice is to allow for a minimum of 40mm overhang to the throat or drip.
Trims at verges and eaves and soffits can be a concern, and these should be formed to ensure a good watertight seal is provided. Should there be a detail that standard trims would struggle to overcome, then it is recommended that site specific trims be allowed for and measured on site.
MESHING l BASECOAT INSTALLATION
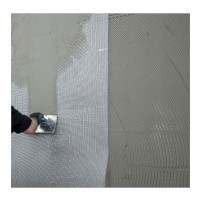 Basecoat application should only be carried out when the weather is fine and free from rain. It is recommended to carryout a daily check on the weather forecast, for a minimum of 48 hours prior to the proposed application of system designers.
Stress patches should be installed to all corners at openings (windows and doors) and should be sized 200mmx400mm
Polypropylene or glass fibre meshes should be installed into the wet basecoat, using the back of a steel trowel and pushed in, so that they sit in the top third. Meshes should be continuous, and should have a minimum 100mm (10cm) lap with the adjacent mesh. Any meshes that are integral to beads and trims should also allow for 100mm (10cm) lapping. This ensures strength and continuity of the basecoat. A second basecoat is then applied, and there should be no visual sign of the mesh once this is applied. Once the basecoat has been applied, it should be left to cure in its appropriate state to receive the final finish.
PRIMER APPLICATION
 The primer helps waterproof the EWI system and act as a barrier to moisture passing from the outside in.
Some primers also have inherent insulation properties adding to the overall efficiency of the system.
Its application is based on painting the entire surface of the basecoat render with a roller or brush.
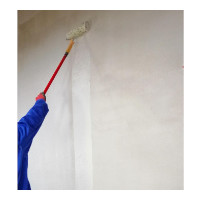
RENDER FINISH APPLICATION
 This is the final layer of EWI and has a decorative function, enhancing the look of your home.
Thin coat render comes in various textured grain sizes, including 1mm, 1.5mm, 2mm, or 3mm. However, the 1.5mm grain is the most popular choice in the UK. This type of render maintains consistent colour throughout, providing an even-coloured texture when applied from the base coat to the surface. Additionally, it allows for customization of the render colour according to preference. Once applied, it delivers a uniform weatherproof finish, making it highly durable and suitable for areas prone to damage from exposure. Packaged in wet form pre-mixed in 25kg buckets, thin coat render is available in a wide range of colours.
Applied at a thickness of 1-3mm onto a flexible basecoat layer, thin coat renders typically leave a textured, slightly grained finish. Despite their name, they are called 'thin coat renders' because they are applied thinly on top of a reinforced basecoat, offering excellent crack resistance. As a result, a bucket of thin coat render provides greater coverage compared to a bag of monocouche scratch coloured render when applied to the wall.
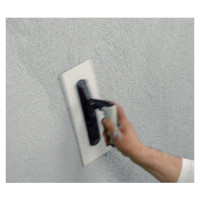
The render application involves applying a thin layer of plaster onto a previously prepared surface. During its drying stage, the plastic spatula is used to smooth and gently drag the surface, achieving the desired final effect.
This final and crucial stage of EWI installation requires precision and favourable weather conditions. Applying the final render in adverse weather is strongly discouraged. Moreover, it's best to avoid application on extremely sunny days, as rapid drying may lead to surface cracking. The best practice in such situations is to use shading nets on the scaffolding, which reflect sunlight rays.
Related Searches:
EXTERNAL WALL INSULATION. THE UGLY TRUTH
DIFFERENCE BETWEEN EPS AND XPS INSULATION BOARDS
*Insulationgo LTD strives to keep the content accurate and up-to-date, but we cannot be held responsible for any mistakes or exclusions.
The information in this article isn't expert advice and shouldn't replace talking to the right specialists. Before buying or deciding anything based on this info, it's best to contact the product manufacturer directly to double-check if it's right for what you need.
Descriptions, drawings, photographs, data, proportions, weights, and measured values provided here may change without prior notice and do not establish the guaranteed contractual quality of the products. The recipient of these products holds the responsibility to comply with proprietary rights, existing laws, and legislation.
Using this articles implies acknowledgment and agreement that Insulationgo LTD cannot be held accountable for any damages, losses, or inconveniences resulting from the use or reliance upon the information provided. This limitation of liability extends to all users of the article, including visitors, readers, and subscribers.
