


How to Dot & Dab thermal wall insulation boards.
Kingspan K118, Xtratherm XT/TL*
Selecting a house with insulated plasterboard has been such a game-changer. Thermal plasterboard made our house so much warmer and so much easier to heat. In this article we will try to explain all you should know about Dot and Dab technique. There is a good reason for that.
More and more people simply can not afford expensive labor costs. That is why we want to make it comprehensive as possible with an idea that if you follow everything you read here there is no reason why you can't tackle projects like this.
Dot and dab applications involves dabbing dots of plasterboard adhesive directly onto the wall, and then pushing the plasterboard sheet to the adhesive and allowing it to set.
First think first, by installing insulated plasterboard suddenly the wall itself feels warm to the touch. Moreover you will find yourself turning the radiator down half of the time during coldest months of winter.
Installing plasterboards with dot & dab technique is actually really easy thing to do as long as you fully research which installation is right for your project and what thickness of insulation will achieve the U-values that you need. Best way is to contact your local builders merchants and see what equivalent products they do. With Insulationgo Ltd you can fairly easy get all answer for your project. Having said all that lets get to the point.
Battens vs Dot&Dab
"Dot and dab" technique is much easier process than having to attach battens to the wall. In most of the cases with battens method you have to pack out every single band to ensure that each band is not only plumb but also lined up down the wall before you screw the plasterboard to the wall.
Whereas when you using ‘Dot and Dab’ adhesive bonding you can make up those irregularities in the wall with the different thicknesses of the adhesive dab itself.
Where I can use Dot and Dab technique?
It is not suitable for use on such walls where there is a risk of moisture penetration or on timber or steel frame construction. This method is only suitable for use on brick block or concrete cavity or rendered solid walls which are dry, stable and most importantly free from moisture penetration. Where you don't have cavities in your wall you shouldn't adhesively bond because of the risk of moisture penetration from outside.
In this particular situation you should always mechanically fix wooden battens and screw the plasterboard to battens.
What will I need for this method?
To complete a successful and professional dot and dab, you will need the following tools.
- bucket
- bucket trowel
- rasp planer
- plastering hawk
- plastering trowel
- universal saw
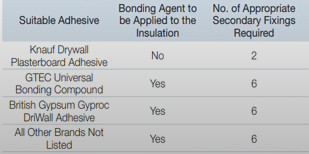
In terms of adhesive itself you got an option of Gyproc Drywall Adhesive or Knauf Plasterboard Adhesive.
Of course you will need insulated plasterboards.
Kingspan Kooltherm K118 Insulated Plasterboard
Xtratherm Safe-R SR/TB Thermal Liner
Xtratherm Safe-R SR/TB-MF Thermal Liner
Before you start
- You need to remove wallpaper, skirtings, picture rails and gloss paints.
- You got make sure the wall surface is clean, stable and free of dust and loose material. In some cases you may have to remove some parts of render where it's not strong enough to actually hold weight of insulated plasterboard itself. The quickest way to do so is of course by knock on the wall several times. Places that will make a blank, empty sound are places that need to be removed. By removing loose render you got extra opportunity to check if the brickwork behind is completely dry.
- Don't use it to insolate damp!
- Don't use in continuously damp or humid conditions!
- Remember, if you insulating more then 50% of the walls you need Building Regulations approval.
Preparation
There is no reason why you shouldn't be using primer or PVA on the wall. Most of manufacture's recommend it where you need to reduce suction or improve mechanical key. If the brickwork is dusty you must always apply a very light watered-down coat of primer. It is down to you to be absolutely sure there is no dust left before you start. If your wall system does fail in this point because of the dust, well.., you only got yourself to blame.
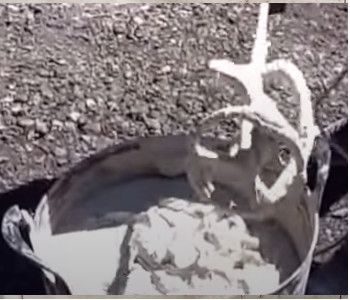
Mixing an adhesive
You will need to mix your adhesive by very carefully following the instructions provided on the manufacturer’s bag. To mix adhesive you should be using any old drill with mixer attachment. If you are about to do a lot of this, you be better of investing in better power mixer. Ensure you have clean tools such as a bucket and mixing stick. Any dirt or dust may contaminate the adhesive. This is the most important step, because if you don’t have sturdy adhesive, the plasterboard will not be secure.
Gyproc adhesive are massively helpful on this. The quality of the job done relies heavily on the adhesive you choose to use.
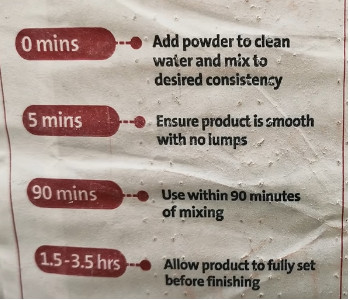
You will find that the more you practice is the better consistency you archive. You want it to be sort of firm enough to form on the wall. If it's a bit too sloppy you wouldn't be able to do that. Ones it has really nice stiffness turnout it is perfect and good to go on the wall. Depending of manufacturer you got around 90 min to play with before glue goes off.
How to apply plasterboard adhesive?
You want to apply dabs between 10 and 20mm thick. Allow 50mm gap between the underside of the board and the floor. You got to allow this gap on the floor because you don't want damp getting in from floor into underside of the plasterboard.
Apply the plaster to the wall in vertical and horizontal lines across the top, bottom and sides, and then down the center. Apply bonding agent to back of the board if required.
By doing so yo assist board with extra bonding strength. You may find this irritating because you would have thought if they design a board that is suitable for adhesive bonding you wouldn’t have to apply additional bonding agent.
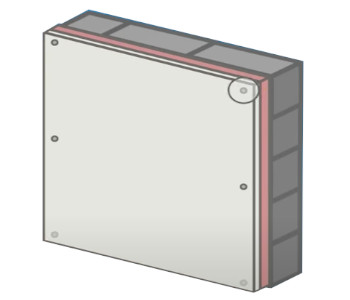
You have to apply this in 150mm bands around perimeter and down the middle of the plasterboard to coincide where your decent dabs was going to be on the wall.
It is recommended 3 vertical rows of adhesive, a minimum of 22% of plasterboard area.
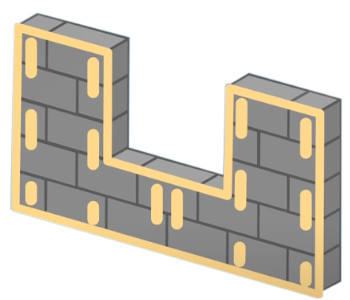
Each piece of dab should be 50mm to 75mm wide at 250mm long. Don't bridge the board joints with adhesive.
Even though this is adhesive, you meant to apply a mechanical fixing after the adhesive has set to the plasterboard.
6 screws per sheet is recommended.
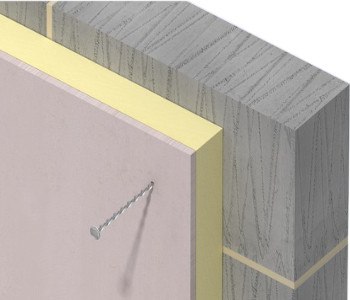
This is to help secure board. Being all metal it can be hammer straight into the wall. Where you got substrata like concrete block you need to use a 5mm pilot hole then use the neat neat attachment for your sds drill bit.
Final adjustments
You need to mark the position of each board on the wall. That way you will easy know where to stop with your adhesive.
It is a good idea when you are laying boards in position before you apply an adhesive, to draw guidelines on the floor and ceiling. That way you can simply press the board into position up to your guidelines.
You will need to cut your plasterboard to the correct size before you begin applying adhesive.
When applying adhesive all around the openings of the services such as electrics it is recommended to seal those areas around with adhesive at that point.
To attach it, press it onto the surface of the wall that has the pre-applied adhesive and remain in place until it is attached to the wall. You can use a level tool to tap the surface of the board and make sure it is secured to the plaster dots.
If you’re worried about your plasterboard being properly straight and level, a featherhead tool can be used to smooth the surface and make sure the plasterboard is firmly fixed.
Manhandle sheet until it's flush with the lines that are marked on the floor. Check with spirit level. Make sure there is no gaps between the feather edge and the plasterboard.
If skirting board will be placed after the process, ensure there is a solid line of the plaster where this will be fixed.
Finishing insulated plasterboard
Finish can be applied within a short time frame. Dot and dab linings can be skimmed with plaster, painted or wallpapered.
If the wall is to be wallpapered, a couple of coats of drywall primer should be applied before papering.
*All the information provided in the content published on Insulationgo blog is for informational and educational purposes only. Insulationgo LTD makes every effort to ensure the accuracy and timeliness of the content, but we do not assume any responsibility for any errors or omissions.
The information presented on this blog should not be considered as professional advice or a substitute for consulting relevant experts. Before making any purchase decisions or taking action based on the information presented here, it is strongly recommended to contact the product manufacturer directly to verify the details and ensure its suitability for your specific needs.
By using this blog, you acknowledge and agree that Insulationgo LTD shall not be held liable for any damages, losses, or inconveniences arising from the use or reliance on the information provided herein. This limitation of liability applies to all users of the blog, including but not limited to visitors, readers, and subscribers.
