


Looking for perfect substrate board for render system?*
If you’re not satisfied with the exterior of your home there is a wide range of cladding and renders to get the look you desire. Do you love the clean look of contemporary houses? Then a simple rendering could be your answer. To archive this you will need render carrier board first. Alternatively, if you want a traditional wood look, Cedral wood cladding could add authentic appeal.
Different types of render carrier boards are available in the UK. Render carrier board manufacturers create boards with different properties, however all of them have one thing in common.
They provide a solid and durable backing surface for thin coat render systems to be applied to. They withstand the extreme weathering effects of wind, rain and snow.
They are mostly used on treated timber and steel frame buildings. Some boards are lighter and easier to cut when other don't offer "score and snap' cutting techique. Hovewer, most of them offer class A1 (non-combustibility)
Render carrier boards start from thicknesses 6mm and 9mm to 12mm.
We strongly recommend using 12mm thick board. Why? For simple reason-12mm board ensure extra strength and stability.
When specifying a render board, the customer must always ensure they have conducted their own checks to ensure the specified board meets their performance requirements and that the correct fixing and installation works are completed in accordance with board supplier’s recommendations.
When a project has a render board specified, it should be a board that has the capability to be directly rendered to and hold a third-party accreditation (namely a BBA certification) for the intended application or meet the harmonised standard BS EN12467:2012.
A wood-based board, cement particle board or a non-approved board should not be used externally where render application is required.
What is the differnece between Cement Partice Boards and Render Carrier Boards?
Cement partice boards as a non-specialist boards have elements within their composition that are highly susceptible to water penetration, retain moisture and swell which drastically affects their capability. Pull-off and pull through values will be wholly affected and all non-suitable boards will cause the render system to fail.
Apart from initial construction difficulties, moisture retention under the right conditions provides the medium for mould to form and spread behind the render system. Cement patrice boards may also become unstable and if mould growth is apparent, could create health implications to the building occupants too.
Can I use Cement Patrice Board for rendering?
No, this type of board is unsuitable for direct render applications, is not A2 fire classification as a minimum.
It should not be used for any type of external render application.
What is Render Carrier Board then?
We talk about render at the same time as cladding as it is a way of cladding your home. However, while most cladding materials are dry and fixed to the home with screws or fittings, render is a wet coat applied much like plaster. This render goes direct on the render carrier board- an impact-resistant, dimensionally stable and weatherproof construction board for use as an external render carrier. Theay are specifically formulated to achieve a strong key between basecoats and top coat renders.
What is Render Carrier Board suitable for?
It is suitable for receiving a wide range of finishes including various render types, paint, plaster and brickslips, making it the ideal choice for both internal and external applications.
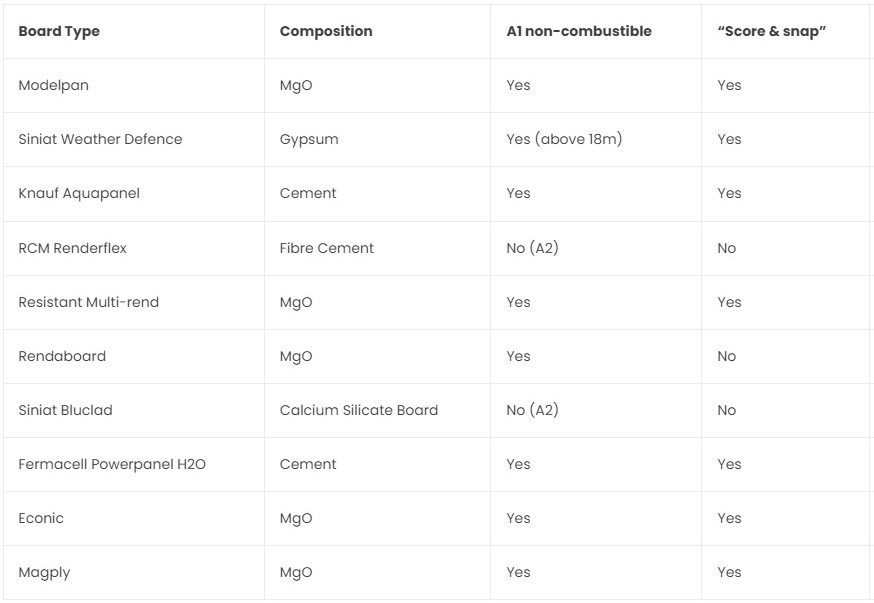
What are the common Render Boards in UK?
The most common Render Boards on the market are Renderflex, Aquapanels and Siniat boards.
What all Render Boards have in common?
All render carrier boards should be attached to either wooden battens or a steel frame in a staggered formation. Each board should also have a 3 – 5mm gap between them and their neighbouring board.
All joints should be then protected with carrier board joint tape. All render boards require conventional mesh to be placed over the whole surface area of the boards. The mesh is generally pressed into the base layer of render however different render suppliers will have their own application instructions which must be followed.The render should have alkali-resistant mesh embedded into the base coat across the whole surface.
Render board - what side do I render onto? Do I render to the rough or smooth face?
All render carrier boards are dual faced.
We recommend that the 'smooth face' is rendered onto(smooth side out). If the boards have been installed rough side out, make a note of the batch number against the project name and render can be applied to the rough side. The batch number is on the rough side.
2 tips fixing Render Board
First tip would be to fit sufficient screws onto the render board.
Not fitting enough screws will mean that the render board will move slightly (even less than 1mm) and the render will end up cracking. Soon after you will notice the cracks when the render gets .
Second tip would be - ensure that you use stainless steel screws because the rust will come through to the render over time if standard screws are used.
Why Render Boards are so popular?
Render Boards offer additional protection from weather conditions thanks to their high strength, but are also easy to work with as they can be cut onsite. These features make them a popular rendering solution. Render Carrier Boards are polpular due to high tensile strength which resists bending to prevent cracking and deformity, providing excellent impact resistance.
Do I need to apply insulation on Render Board?
Sheets are designed to be used as a render carrier board, where there is no insulation applied to the board prior to rendering. It is recommended to isolate the board from the inside.
How do I cut Render Boards?
Render boards can be cut, drilled and worked with joinery machinery or a jig saw.
How to install Render Carrier Board?
The vertical and horizontal joints between the boards must be staggered with the joints spaced 2 mm. Ensure the head of the screw fixing is flush with the board surface. Crooked screws and screws that are not flush must be removed and replaced.
Using basecoat fill the 2mm joints between the boards, then apply render mesh over the joints and lightly trowel the mesh onto the adhesive basecoat surface. Once all the joints have been filled and meshed apply a further adhesive basecoat to the entire surface with a minimum thickness of 3 mm. Lightly trowel render mesh to the surface of the 3mm coat.
The individual render mesh lengths must be laid horizontally and must have a minimum overlap of 100mm.
Once the entire area has been meshed add a further 2mm cement based adhesive coat over the top over top of the entire meshed area troweling to a smooth finish.
Once the meshed basecoat has dried minimum 24 h you can apply a primer to the surface of the meshed basecoat and allow to touch dry before applying textured acrylic or silicone renders.
Do I need planning permission to add exterior finishes?
Changes to your home’s exterior appearance may be subject to planning rules set down by your local council – so always check with them first. Your budget, the look of other houses nearby, or what your local council approves will all influence the material you choose for your exterior.
*All the information provided in the content published on Insulationgo blog is for informational and educational purposes only. Insulationgo LTD makes every effort to ensure the accuracy and timeliness of the content, but we do not assume any responsibility for any errors or omissions.
The information presented on this blog should not be considered as professional advice or a substitute for consulting relevant experts. Before making any purchase decisions or taking action based on the information presented here, it is strongly recommended to contact the product manufacturer directly to verify the details and ensure its suitability for your specific needs.
By using this blog, you acknowledge and agree that Insulationgo LTD shall not be held liable for any damages, losses, or inconveniences arising from the use or reliance on the information provided herein. This limitation of liability applies to all users of the blog, including but not limited to visitors, readers, and subscribers.
