


TOP TIPS ON HOW TO INSTALL FOIL FACED INSULATION THE RIGHT WAY*
Foil Faced Insulation has become incredibly popular, especially in the United Kingdom. Builders and homeowners appreciate its effectiveness in preventing heat transfer and enhancing energy efficiency. The reflective properties of the foil layer make it ideal for diverse environments, solidifying its position as a top choice in the construction industry. This insulation type excels in retaining heat by reflecting radiant energy, allowing for improved U-values with thinner layers. Given the unpredictable English weather, creating uncomfortable indoor temperatures, foil insulation, like Rockwool RW or Knauf RS , becomes a crucial solution for maintaining thermal efficiency.
In this article, we'll focus on the correct installation of Foil Faced Insulation, especially for those looking to install it themselves.
If you're planning a DIY installation of foil insulation, here are some helpful tips to guide you.
 TABLE OF CONTENTS
- TOP TIPS ON HOW TO INSTALL FOIL FACED INSULATION THE RIGHT WAY
- WHAT IS FOIL FACED INSULATION?
- WHICH WAY DOES FOIL INSULATION GO?
- WHERE TO USE FOIL FACED INSULATION?
- WHAT ARE THE TYPES OF FOIL FACED INSULATION?
- 1.HOW TO INSTALL FOIL BACKED INSULATION ON WALLS?
- 2.HOW TO INSTALL FOIL BACKED INSULATION ON CEILING?
- 3.HOW TO INSTALL FOIL BACKED INSULATION ON CONCRETE WALLS?
- 4.HOW TO INSTALL FOIL BACKED INSULATION ON ROOF?
- 5.HOW TO INSTALL FOIL BACKED INSULATION ON FLOOR?
- 6.HOW TO INSTALL FOIL BACKED INSULATION IN A SHED?
- 7.HOW TO INSTALL FOIL BACKED INSULATION AROUND WINDOWS AND DOORS?
- THERMODYNAMIC vs FOIL FACED INSULATION
WHAT IS FOIL FACED INSULATION?
Foil faced insulation creates a barrier between the inner parts of a home and the external weather conditions. The reflective surface acts as a barrier to reflect the heat from one side of the panel, preventing it from transferring to the other side. Therefore, the amount of heat that travels through the insulation by conduction is greatly reduced. Moreover, foil backed insulation is non-combustible. The foil covering is class O rated so it complies with current building fire regulations.
WHICH WAY DOES FOIL INSULATION GO?
To understand which side the foil should face, it is essential to recall basic laws of physics. These laws state that the flow of energy occurs due to temperature differences between bodies and always moves from a warmer to a colder body. Therefore, warm heated air in a room will always seek to escape towards the cold. To prevent this process, a physical barrier should be placed between these temperatures, typically in the form of insulation.
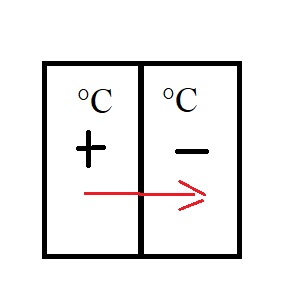
Unfortunately, insulation itself tends to accumulate heat over time. However, insulation with aluminum foil not only accumulates heat but also reflects the heat source as per below picture.
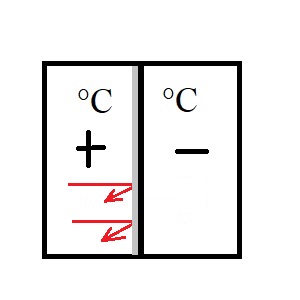
By placing a barrier between two different temperatures, we prevent heat loss. Additionally, using insulation with aluminum foil reflects the heat back into the room, providing a double benefit.
Therefore, it is crucial to install foil-faced insulation on the correct side.
When working with foil faced insulation, you should use its advantages accordingly. Therefore, when installing foil faced insulation always fit the foil side where the temperature difference is greatest.
So, any time you use a single side foil insulation, the foil needs to be facing toward the living space. So in a loft the foil faces downward. If you install double faced insulation it doesn't really matter which side is out. Neither side does the same job. Therefore, it is recommended to use insulation with foil on both sides.
Picture credit:pbs.twimg.com/
WHERE TO USE FOIL FACED INSULATION?
Foil-faced insulation can be used in very specific situations such as:
- Pitched roof – between rafters creating vapour barrier and preventing moisture build up.
- Ceiling - between floor joists where it acts as a sound transmission barrier.
- Hot parts of a house that may become overheated during summers.
- Commercial buildings where foil prevents the spread of flames and inhibits heat and smoke through concealed spaces.
- Government buildings to maintain high performance over the lifetime of the building.
- New build and refurbishment projects.
- Internal partitions, timber and metal studs where excellent sound absorption characteristics are needed.
WHAT ARE THE TYPES OF FOIL FACED INSULATION?
Foil faced insulation comes in many formats such as:
- foil backed fibreglass wool,
- foil backed rock mineral wool such as Rockwool RW or Knauf RS,
- foil backed polystyrene (EPS),
- foil backed PIR such as Celotex or Kingspan.
Because of the way foil backed insulation works, foil needs a section of air next to the reflective surface to work. This is where the heat goes once it has been reflected back from the insulation surface.
Therefore, all types of foil backed insulation reflects radiant heat and works best with an air layer of at least 25mm/1 inch.
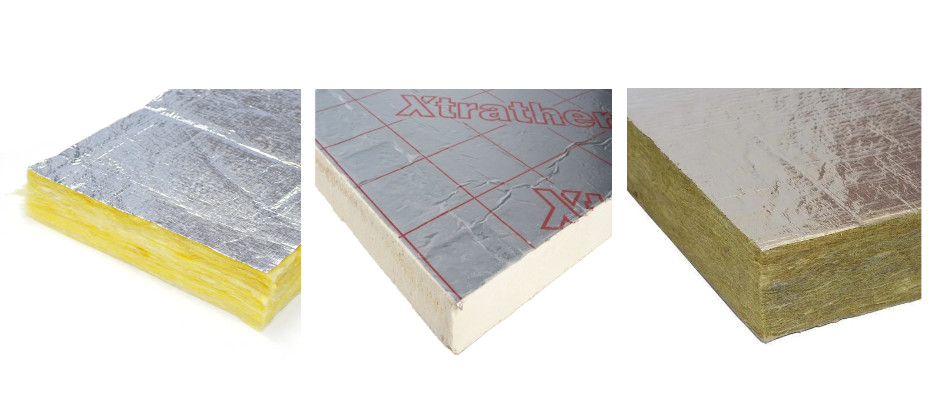
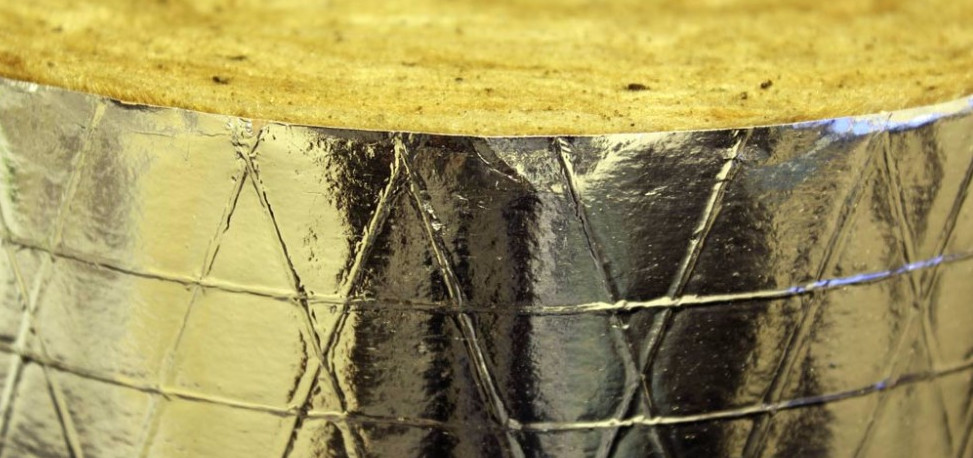
Foil faced fibreglass,pir,stonewool
HOW TO INSTALL FOIL BACKED INSULATION ON WALLS?
If you are wondering how to install the foil backed insulation on your walls here you have few tips to consider.
- if it is hot outside, the reflective part of your foil insulation must face outside.
- if it is freezing outside, the best orientation of the reflective part is inside.
- if you press the foil side of the insulation tight up against the wall (foil facing outward), the radiant barrier will not work.
- if you create a gap between the wall and the insulation board (foil facing out) then you will have a radiant barrier. Here, not only is your insulation working, but so is the radiant barrier - you are reducing your conductive and radiative heat loads entering the building. The insulation will keep the heat out on hot days, and keep the heat in on cold days, and the radiant barrier will keep the heat out on hot days.
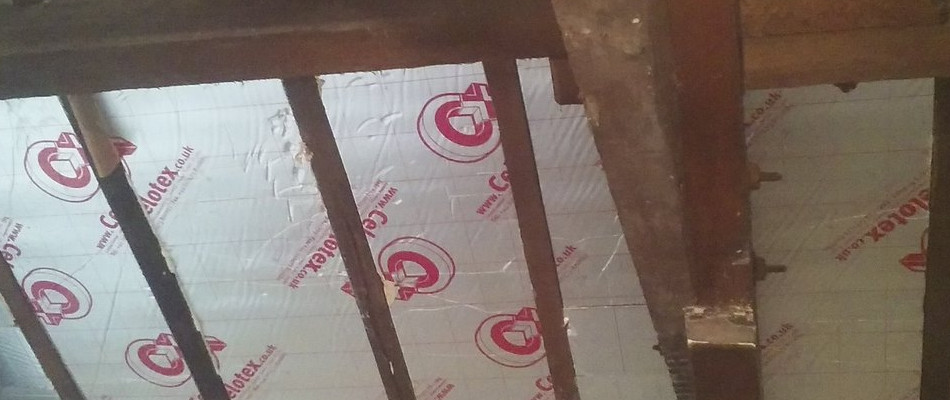
HOW TO INSTALL FOIL BACKED INSULATION ON CEILING?
Generally speaking, there are two methods of installing foil backed insulation on ceilings. Regardless of the method, the foil should be placed on the warm side of the room.
In the first most commonly used method, the foil faced insulation goes between the ceiling joists. It does not take up much space and does not change the height of the ceiling. Nevertheless, the continuity of the insulation itself is interrupted and the aluminium foil does not constitute a barrier in its entirety. Usually this form of installation does not require screws to be used.
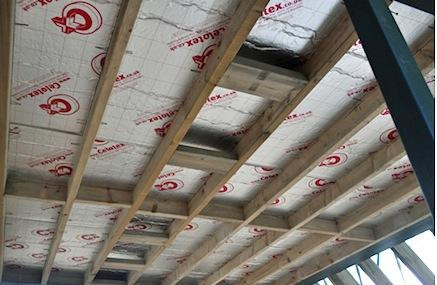
Picture credit:https:voltimum.co.uk
While the second method is more effective, it is less frequently used. Here, foil backed insulation goes over ceiling joists creating continuous insulation and vapour layer. This method requires long screws to be used. Therefore, holes are created. When laying your foil faced insulation over the joists, it’s best to work at a 90-degree angle to the joists, running in the opposite direction.
HOW TO INSTALL FOIL BACKED INSULATION ON CONCRETE WALLS?
In the UK, a home's concrete walls are in the basement. This creates challenges. Why? Because basement walls are almost always below grade. When heat or cold comes in contact with concrete it passes right through with almost no resistance.
Typical insulation works in a basement but you have to use a good vapour barrier along with it. This is where foil faced insulation takes its place.
The best way to insulate a concrete wall is with foil faced rigid foam boards. If you want to have a vapour barrier between the concrete and the interior, foil-faced EPS or PIR are an excellent choice for that.
There's no point in trying to let the concrete dry to the interior, you'll never dry it out because it's constantly replenished from the moisture in the soil behind it. You just want to block that moisture and keep it in the concrete, the more so moisture doesn't harm concrete and even makes it stronger.
When insulating a basement, make sure the house doesn’t have water problems. If it does, fix those issues before insulating. If you are installing foil backed insulation such as EPS you can not use screws. The best way would be to use adhesive. Adhesive does not interfere with the continuous aluminium foil face. Always butt board edges together tightly and also use maximum boards lengths to minimise the number of joints. Foil-faced insulation joints must be covered with an approved aluminium tape. As long as the seams between each sheet are sealed with aluminium tape and the gap at the floor is caulked, no moist room air can get to the cold concrete.
HOW TO INSTALL FOIL BACKED INSULATION ON ROOF?
For insulating a warm roof in particular, foil backed insulation is a great choice. Pitched roof insulation installation is very similar to the ceiling. While insulating the ceiling, foil backed insulation is usually placed between the floor joists or over the joints, in a pitched roof, these two methods are used.
The easiest way to insulate the roof with foil faced insulation is between and beneath the rafters as you don’t have to worry about the accuracy of the cuts. The best material to insulate the roof would be either double faced stone wool such as Rockwool or Knauf or rigid foam board such as Unilin or Celotex.
However, this may not be an option if the space is tight because it will eat into the available headroom. Using insulation with foil on both sides you won’t have to worry about its direction. Whichever site you install, it will always be fine.
For instance, if you chose double sided foil insulation you can say that a quadruple layer of vapour barrier is created. For your own comfort and safety, try to avoid installing it in the middle of the summer, when your loft is at its hottest.
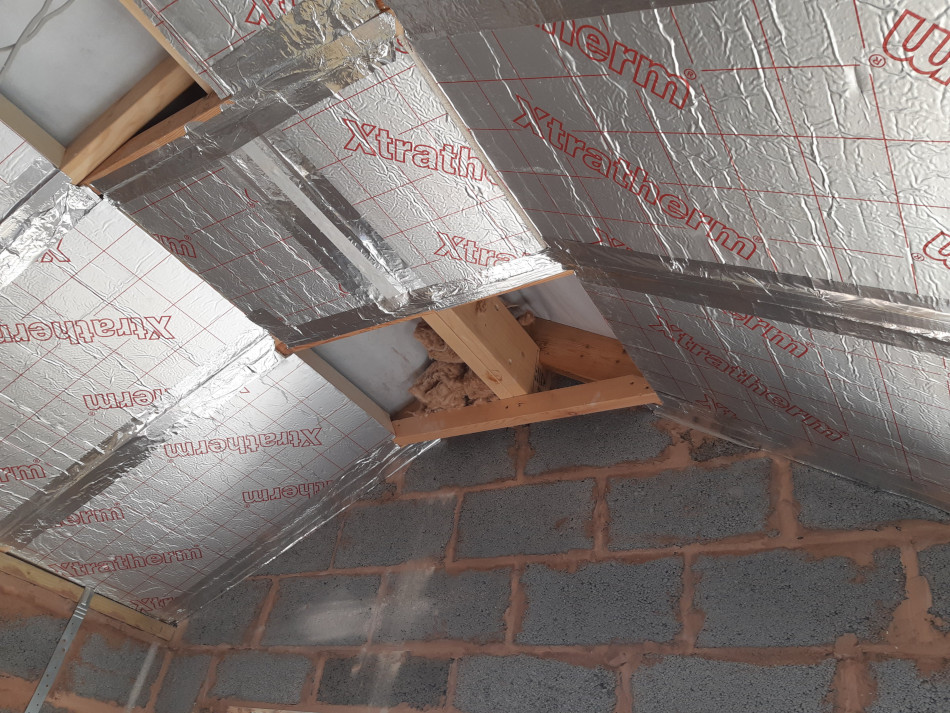
Picture credit: diynot.com
HOW TO INSTALL FOIL BACKED INSULATION ON FLOOR?
To achieve maximum floor thermal and vapour performance and to ensure fast and simple installation of foil faced rigid insulation panels for retrofit or new underfloor systems, it is recommended to do the following.
- measure distance between floor joists,
- cut PIR foil faced board to size (for more information how to cut PIR click here),
- install foil faced board between floor joists,
- use aluminium tape to seal the but joins between the rigid boards and any other minor gaps,
- continue along cutting around any services as required,
- fill the holes with expanding foam.
For more information on how to install foil faced insulation beween floor joist click here
HOW TO INSTALL FOIL BACKED INSULATION IN A SHED?
Insulating a shed isn’t a must-do project, however, it can make it a more pleasant place for you. Moreover, an insulated shed might prove a better environment for the items you store inside it.
Insulating your shed can be done cheaply with a few quick hacks. To achieve best thermal performance and to ensure a fast installation of foil faced rigid insulation board to a shed it is recommended:
- to get full access to the shed remove all of its contents,
- rigid insulation panel such as PIR should be installed between the wall girts and to the underside of the roof battens,
- fasten the foil faced insulation panel to the roof battens with screws using approx. 6 per m2,
- cut the foil backed boards to fit between the floor joists, laying them flush with the top of the joists, next replace the floor,
- use aluminium tape to seal the but joins between the rigid boards,
- if your shed is made of wood, you can finish the walls with plywood.
You can use stone wool foil faced insulation such as Rockwool RW or Knauf RS for shed walls if you want the very best sound insulation for yours. Use slabs with a vapour barrier to control moisture.
For more info click ‘3 ways to insulate your shed’
HOW TO INSTALL FOIL BACKED INSULATION AROUND WINDOWS AND DOORS?
If you are placing the foil backed insulation in a window, face the radiant barrier outward. Otherwise, the heat that enters through the window will serve to heat the insulation board, and the board will in turn, serve to heat the room like a heating element in the oven. The radiant barrier facing outward will prevent this to a certain extent.
THERMODYNAMIC vs FOIL FACED INSULATION
Thermodynamic fact of life - if you put any two objects with different temperatures together, then heat transfer will cause them to reach the same temperature.
Foil faced insulation works on "Thermos" principles.
For instance, if you want to keep your hot tea as long as possible inside Thermos - that is, if you want to slow down the natural heat transfer process as much as you can - you have to slow down the 3 processes that cause heat transfer. In other words:
- Conduction
- Radiation
- Convection
To build a good thermos (in this case - insulation), what you want to do is reduce these three heat transfer phenomena as much as possible. So, the foil goes on the warm side to reflect the heat back. If it is on the cold side, the smaller amount of low temperature radiation will not go directly back into the room but into the insulation where it will be absorbed.
CONCLUSION
In summary, it is crucial to remember that foil-faced insulation is one of the most modern forms of home insulation, serving dual functions. Its insulating core protects against cold, while its aluminum foil reflects heat back to its source. This ensures that the insulation is always effective and fulfills its purpose. The aluminum foil on the upper part of the insulation can, under specific conditions, act as a Vapor Control Layer (VCL) and provide additional protection against rodents, for whom the foil may be irritating.
Foil faced insulation is also invaluable when it comes to fire performance. It is entirely non-combustible, and the aluminum foil further safeguards our home.
Installing foil faced insulation is not particularly complicated; one just needs to keep in mind the basic principles of physics and place the foil on the side where heat or cold retention is desired.
Related articles:
UNFACED INSULATION. CHANGE BEFORE YOU HAVE TO!
STEP-BY-STEP GUIDE: HOW TO INSTALL CELOTEX BOARD BETWEEN FLOOR JOISTS
VALUABLE TIPS FOR INSULATING A PITCHED ROOF BETWEEN RAFTERS
MASTERING THE ART OF CUTTING CELOTEX AND KINGSPAN INSULATION BOARDS: TECHNIQUES, TOOLS, AND SAFETY
HOW TO INSTALL INSULATED PLASTERBOARD?
HOW TO PREVENT WINDOW CONDENSATION
ROCKWOOL® HEAVY DENSITY INSULATION
How to insulate a campervan with Low-E™ Reflective Foil Insulation
Low-E Reflective Foil Insulation Reviews and Practical Tips
How to cut a PIR insulation board?
*All the information provided in the content published on Insulationgo blog is for informational and educational purposes only. Insulationgo LTD makes every effort to ensure the accuracy and timeliness of the content, but we do not assume any responsibility for any errors or omissions.
The information presented on this blog should not be considered as professional advice or a substitute for consulting relevant experts. Before making any purchase decisions or taking action based on the information presented here, it is strongly recommended to contact the product manufacturer directly to verify the details and ensure its suitability for your specific needs.
By using this blog, you acknowledge and agree that Insulationgo LTD shall not be held liable for any damages, losses, or inconveniences arising from the use or reliance on the information provided herein. This limitation of liability applies to all users of the blog, including but not limited to visitors, readers, and subscribers.
