


BOOSTING THERMAL EFFICIENCY AROUND WINDOWS USING INSULATED PLASTERBOARD*
When it comes to improving the thermal insulation of interior walls using insulated plasterboard, a common consideration arises: how to effectively implement this around window reveals. This article aims to provide valuable insights into the proper execution of this process, including the recommended thickness of the insulated plasterboard and the essential materials required for its successful installation.
HOW DO I GO ABOUT INSTALLING THE INSULATED PLASTERBOARD AT WINDOW AND DOOR REVEALS? RIGHT THICKNESS
Window reveals are the parts of walls that are most vulnerable to freezing temperatures. Improperly insulating them can lead to nothing but cold drafts and unnecessary drops in room temperature. That's why it's crucial to ensure proper insulation for these areas. One effective approach is using a 2-in-1 insulation and plasterboard material, which offers a swift way to finish windows and doors. However, a challenge arises when there's limited space for installation.
The key factor here is choosing and acquiring insulation material with the right thickness. Opting for insulated plasterboard that's 112.5mm thick would be unwise. Not only would this prevent us from opening windows, but it could also obscure parts of the windows themselves, which doesn't make much sense.
INSULATED PLASTERBOARD THICKESSES FOR REVEALS
For effectively insulating around window openings, it's advisable to use insulated plasterboard no thicker than 30mm. There are 5 available thicknesses of insulated plasterboard suitable for insulating windows and doors around the openings:
Keep in mind the thickness of the plaster layer, around 5-7mm, or the filler, typically 2-3mm.
The most commonly chosen thickness for insulated plasterboard when working around windows and doors is 24.5mm (or 25mm). This thickness strikes a balance, providing sufficient insulation around the windows while adhering to maximum allowable dimensions. If the plan is to finish with a plasterboard joint compound, a slightly thicker 29.5mm layer can be used since the joint compound isn't as thick as multi finish plaster.
GUIDELINES FOR INSULATING WINDOW REVEALS WITH INSULATED PLASTERBOARD
Now that you've selected the appropriate material thickness, it's time to delve into the correct installation process. Depending on your window configuration, there are various methods to insulate using insulated plasterboard. To start, rule out using timber battens, as their added thickness makes thermal boards unfeasible.
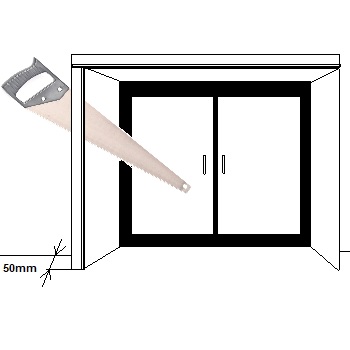
A practical technique for insulating window reveals with insulated plasterboard around the window frame focuses on the windows themselves. Imagine your window reveals are around 300mm deep; in this case, cut the reveal boards to a length of 350mm. Affix them in position, then address the adjacent walls. Afterward, trim the excess 50mm, add beading, and finish off with a skim coat. While this method might seem unconventional, it simplifies the alignment adjustment of the boards during installation.
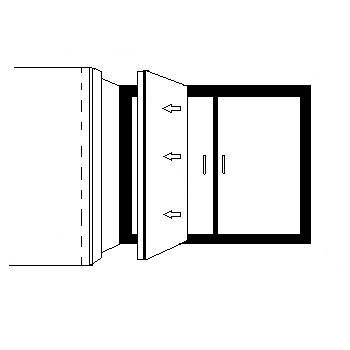
An alternative method involves securely attaching smaller sections of insulated plasterboard around the windows after previously marking the vertical lines on the walls. If you've established these reference points, they can guide you effectively. This approach does have a minor drawback: once the insulated plasterboard is in place, its adjustment can be tricky. However, a solution exists. By inserting a long, thick screw at the desired point and gradually adjusting it, you can attain the desired alignment, be it vertical or horizontal.
Moving on, let's focus on the adhesive material. To attach insulated plasterboard around reveals, you have two options: drywall adhesive or low-expansion foam. Drywall adhesive is commonly used, but it tends to create unnecessary gaps, increasing dimensions and limiting the potential for thicker insulation.
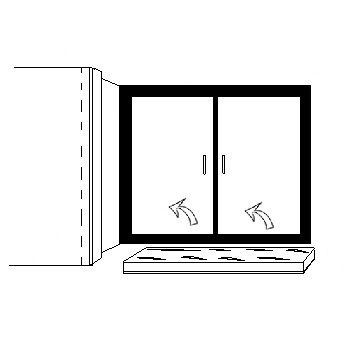
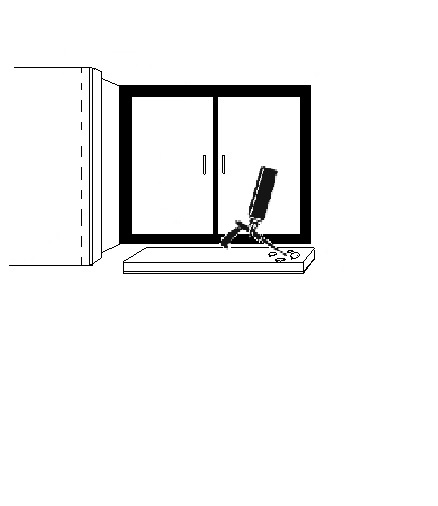
Hence, a superior alternative for attaching insulated plasterboard around reveals seems to be low-expansion foam. Foam requires minimal space for bonding and enhances window insulation with its additional thermal properties. One drawback of foam adhesive is its expansion during drying. Thus, it's vital to exclusively use low-expansion foam adhesive. A wise practice involves temporarily securing reveal pieces with timber supports until the foam is fully dried.
CONCLUSION
In the journey to achieve effective insulation around window reveals, the choice of insulated plasterboard thickness plays a pivotal role. By carefully selecting the right thickness! Through this installation guide, we've explored practical methods for insulating window reveals using insulated plasterboard. Consider the benefits of low-expansion foam adhesive for a seamless bonding process. By following these guidelines, you can create a well-insulated space that not only enhances comfort but also contributes to energy savings.
Related aricles:
How to fit insulated plasterboard
3 methods of cutting PIR insulation boards
How to work out how many square metres of insulation I would need?
How to choose the right Kingspan insulation board for construction?
4 easiest ways to cut styrofoam-polystyrene insulation
Plasterboard cutting techniques.
3 golden reasons why is worth use moisture resistant plasterboard
3 Popular insulated plasterboard thicknesses
5 Benefits of Insulated Plasterboard
How To Dot & Dab Wall Insulation Boards
*All the information provided in the content published on Insulationgo blog is for informational and educational purposes only. Insulationgo LTD makes every effort to ensure the accuracy and timeliness of the content, but we do not assume any responsibility for any errors or omissions.
The information presented on this blog should not be considered as professional advice or a substitute for consulting relevant experts. Before making any purchase decisions or taking action based on the information presented here, it is strongly recommended to contact the product manufacturer directly to verify the details and ensure its suitability for your specific needs.
By using this blog, you acknowledge and agree that Insulationgo LTD shall not be held liable for any damages, losses, or inconveniences arising from the use or reliance on the information provided herein. This limitation of liability applies to all users of the blog, including but not limited to visitors, readers, and subscribers.
