


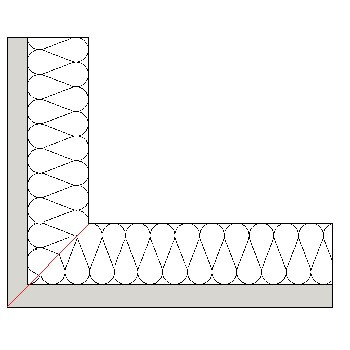
INSULATED PLASTERBOARD ON OUTSIDE CORNER*
The external corners of a building are its foundational elements, and they are highly susceptible to mechanical damage. They are also areas that are particularly vulnerable to wall freezing since the outer surface of the wall always has a larger exposed area compared to the inner surface. Therefore, the correct installation of insulated plasterboard in these corners plays an essential role. It serves not only to shield the walls from cold but also to provide lasting protection and resistance against even the smallest damages.
In this article, we will present two of the most commonly employed methods for installing insulated plasterboard and illustrate which approach to steer clear of when establishing these connections.
WHY INSULATED PLASTERBOARD NEEDS PRECISE CONNECTIONS ON CORNERS?
Insulated plasterboard is a composite of an insulating core and standard plasterboard used for the final surface finish, whether through multi-plaster application or taping and jointing.
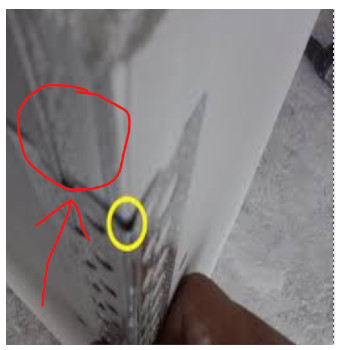
Dealing with insulation cores thicker than 30mm poses a particular challenge when finishing both panels at the corner.
The picture above illustrates a gap where the gypsum board is missing. In this area, only the foam insulation is exposed, and it's not advisable to apply multi-finish plaster directly onto the foam. Doing so not only fails to achieve the desired outcome but also leads to cracks in the plaster.
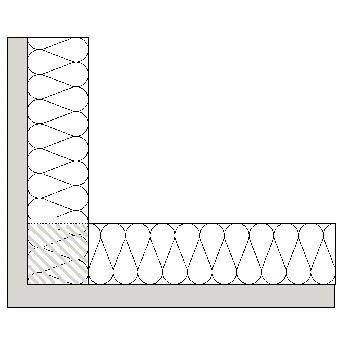
Therefore, it's essential to extend the upper gypsum layer to ensure a perfect meeting of the two boards at the corner.
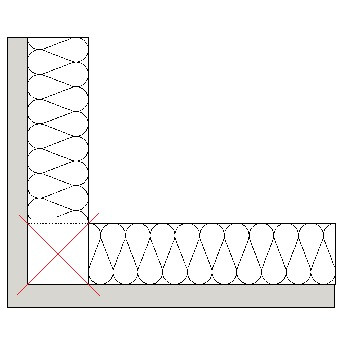
One of the most common mistakes during the installation of insulated plasterboard on exterior corners is the lack of continuity in the gypsum board where multi-finish plaster is applied. Many inexperienced installers simply decide to connect the boards using a butt joint without first removing the appropriate thickness of insulation.
Furthermore, these corners are often quickly covered with aluminium finishing corners, which not only aren't wide enough to cover the insulation core but also create potential issues when later removed.
A more sensible approach would be to use paper corners equipped with metal parts covered in the same paper material as the plasterboard.

Picture credit:titanfix.co.uk
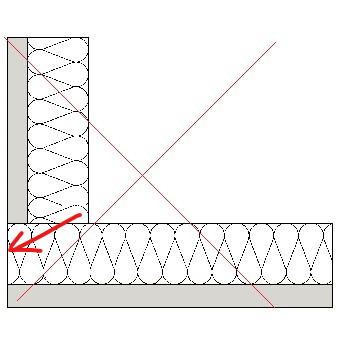
It is also unacceptable to join the boards after completely removing insulation from both of them (half lap). Such connections are not only highly vulnerable to damage but also lead to the formation of a thermal bridge that will inevitably foster mold growth.
In summary, it's important not to join insulated plasterboard in exterior corners without first cutting the insulation on the adjoining boards.
HOW TO JOIN INSULATED PLASTERBOARD ON EXTERNAL CORNERS?
To connect insulated plasterboard correctly on external corners, you can use one of two following methods: the basic butt or the mitered butt.
INSULATED PLASTERBOARD WITH BASIC BUTT JOINT
In basic butt method, the goal is to remove from one adjoining board the thickness of insulation corresponding to the insulation and gypsum board's thickness.
This is the most common method for joining insulated plasterboard on external corners. Unnecessary insulation can be cut using a hand saw or pad saw. For insulation cores up to 52.5mm, a Stanley blade is a suitable tool for this purpose. Simply insert the Stanley blade between the gypsum board and the insulation core and cut at a 45-degree angle to the core. Carefully remove any remaining adhesive insulation to ensure a smooth fit for the twin board. This method is applicable to all thickness ranges of insulated plasterboard.
INSULATED PLASTERBOARD WITH MITERED BUTT JOINT
Mitered butt method involves cutting the insulated plasterboard at a 45-degree angle. While possible for thicknesses up to 62.5mm, it becomes impractical for greater thicknesses due to limitations in the depth of the cutting tools used.
This method is typically used for window reveals or around doors, requiring precision and patience during installation. The drawback of this method is its susceptibility to damage, especially to the corner created by the gypsum board. The tools used for this method are circular saws, and less commonly, hand saws. This method is used for thickness ranges from 27.5 to 62.5mm
CONCLUSION
To sum it up, while it's straightforward to install insulated plasterboard on flat walls, properly installing the corners can pose a challenge. Therefore, it's crucial to select the appropriate joining technique. Thankfully, there aren't numerous options, and a basic butt joint stands out as the simplest and most frequently employed method. Its popularity is attributed to its ease of use and the absence of a need for a circular saw. Achieving correct corner connections is essential for successful wall insulation. Incorrect insulation can lead to nothing other than thermal bridging.
Related articles:
How to fit insulated plasterboard
3 methods of cutting PIR insulation boards
How to work out how many square metres of insulation I would need?
Plasterboard cutting techniques.
3 golden reasons why is worth use moisture resistant plasterboard
3 Popular insulated plasterboard thicknesses
5 Benefits of Insulated Plasterboard
How To Dot & Dab Wall Insulation Boards
*All the information provided in the content published on Insulationgo blog is for informational and educational purposes only. Insulationgo LTD makes every effort to ensure the accuracy and timeliness of the content, but we do not assume any responsibility for any errors or omissions.
The information presented on this blog should not be considered as professional advice or a substitute for consulting relevant experts. Before making any purchase decisions or taking action based on the information presented here, it is strongly recommended to contact the product manufacturer directly to verify the details and ensure its suitability for your specific needs.
Any descriptions, drawings, photographs, data, proportions, weights, measured values etc. given herein may change without prior notice and do not constitute the agreed contractual quality of the products. It is the responsibility of the recipient of all products to ensure that any proprietary rights and existing laws and legislation are observed.
By using this blog, you acknowledge and agree that Insulationgo LTD shall not be held liable for any damages, losses, or inconveniences arising from the use or reliance on the information provided herein. This limitation of liability applies to all users of the blog, including but not limited to visitors, readers, and subscribers.
