


CELOTEX INSULATION: YOUR ESSENTIAL GUIDE TO INSULATION FOR DIY BEGINNERS*
Celotex is the second most well-known brand alongside Kingspan that deals with insulation. Celotex PIR boards are extremely popular in the UK. No wonder why. They are very lightweight, have good R-value, universal, widely available, and easy to install. While they pose no problem for experienced installers, they may cause difficulties for novice DIY enthusiasts. This article is dedicated to such individuals. By reading this article you will find many valuable tips on how to cut Celotex insulation boards or learn how to fit them for a specific installation.
TABLE OF CONTENTS
- CELOTEX INSULATION: YOUR ESSENTIAL GUIDE TO INSULATION FOR DIY BEGINNERS*
- WHAT IS CELOTEX INSULATION?
- WHAT IS CELOTEX INSULATION USED FOR?
- HOW TO CUT CELOTEX INSULATION BOARDS
- HOW TO INSTALL CELOTEX INSULATION BOARDS?
- HOW TO INSTALL CELOTEX FLOOR INSULATION?
- HOW TO INSTALL CELOTEX FOR UNDERFLOOR HEATING?
- HOW TO INSTALL CELOTEX INSULATION BETWEEN FLOOR JOISTS?
- HOW TO INSTALL CELOTEX WALL INSULATION?
- HOW TO INSTALL CELOTEX INSULATION IN TIMBER FRAME CONSTRUCTION?
- HOW TO INSTALL CELOTEX CAVITY WALL INSULATION?
- HOW TO INSTALL CELOTEX TO BRICK WALL?
- HOW TO INSTALL CELOTEX WITH DOT AND DAB METHOD?
- HOW TO FIT CELOTEX INSULATION INTO SOLID WALLS?
- HOW TO INSTALL CELOTEX CEILING INSULATION?
- HOW TO INSTALL CELOTEX ROOF INSULATION?
WHAT IS CELOTEX INSULATION?
 Celotex stands as a leading name in the insulation industry. In fact, Celotex is the name of a company that produces PIR boards under the same brand. It's renowned as one of the industry's giants, with a legacy of over 90 years crafting top-notch insulation products. Celotex insulation boards are manufactured from polyisocyanurate and feature low emissivity foil facings. This makes them highly reflective, bouncing back over 90% of radiant energy.
These boards typically come in a standard size of 2.4m x 1.2m and boast a remarkably low thermal conductivity of 0.022W/mK, positioning them as one of the market's premier insulation solutions.
WHAT IS CELOTEX INSULATION USED FOR?
Celotex insulation has a wide range of applications and can be used for underfloor heating insulation, between floor joists, to insulate solid brick walls, as cavity wall insulation, for ceiling, attic, and roof insulation. As you can see, there's hardly a place where it couldn't be utilised. This makes it an extremely versatile insulation product, resistant to almost all conditions except fire, of course. The most common applications for Celotex are in lofts and floors. It excels in these areas due to its high compressive strength of 120kPa and dual-sided aluminium foil which reflects heat sources.
HOW TO CUT CELOTEX INSULATION BOARDS
Installing Celotex boards is one thing, but cutting them is another story. It's the cutting process that ultimately determines the speed and precision of their installation. Installers often find cutting Celotex boards moderately challenging. We discussed the precise method of cutting PIR insulation in a separate article titled How to Cut PIR Insulation.
HOW TO INSTALL CELOTEX INSULATION BOARDS?
Depending on the location, Celotex boards are installed differently. Installing cavity wall insulation differs from installing between floor joists, and installing underfloor heating is a completely different case altogether. Therefore, it's important to have a comprehensive understanding of each scenario. We've prepared a handy guide for you that outlines the details of each case. Here they are:
HOW TO INSTALL CELOTEX FLOOR INSULATION?
Celotex PIR boards can be installed on the floor in different ways depending on the chosen technology. If you have a suspended timber floor, you can install them between floor joists. Alternatively, they can serve as insulation underfloor heating, especially if you're planning to pour a 70mm screed with water pipes for heating.
HOW TO INSTALL CELOTEX FOR UNDERFLOOR HEATING?
Underfloor heating is a type of heating system that emits heat upwards towards the room, ensuring that most of the warmth travels towards the ceiling, with minimal heat directed downwards towards the floor. Celotex boards serve as a physical barrier between the ground floor and the heating system. They are typically laid on top of an initial concrete screed, sometimes directly on the ground. Celotex boards intended for underfloor heating should be placed on a stable, firm surface, as they will bear the weight of the entire system.
They are arranged on the floor in such a way that each successive row is staggered by half the length of the board, creating a brick pattern to prevent them from moving. Each of their joints should be sequentially sealed with aluminium tape. Typically, 75mm or 100mm tape is used for this purpose. When sealing their joints, special attention should be paid to the method of connecting the boards. In case of any gaps, they should be filled with low expansion foam, and any excess should be trimmed with a Stanley knife. Once laid out and prepared in this manner, the Celotex boards are ready to have the final screed poured directly onto them.
HOW TO INSTALL CELOTEX INSULATION BETWEEN FLOOR JOISTS?
When it comes to installing Celotex boards between floor joists, we thoroughly covered this topic in separate article Step-by-step guide: how to install celotex board between floor joists
HOW TO INSTALL CELOTEX WALL INSULATION?
Depending on the technology, there are three methods of installing Celotex boards for wall insulation. They are installed differently in cavity wall construction, solid wall construction, and timber or metal frame construction. We decided to describe each of them separately.
HOW TO INSTALL CELOTEX INSULATION IN TIMBER FRAME CONSTRUCTION?
Timber frame construction, as the name suggests, is a type of wall construction entirely made of wooden elements. Such walls are insulated by filling all spaces between studs with insulation material, such as Celotex boards. Here, it's worth mentioning their advantage over rolled insulation, which is commonly used for timber frame construction. Unlike rolled insulation, rigid Celotex boards can be installed without attaching plasterboard on one side of the wall. Due to their rigid form, they fit well and stay in place once cut and fitted into the opening.
To properly install Celotex between timber frame construction, you should measure the exact spacing between the timber studs using a tape measure. Then, transfer this measurement onto the Celotex board. It's crucial not to increase this dimension by even a few millimetres, as it will result in trimming them each time, which can be time-consuming and messy. Carefully fit the cut Celotex board between the timber studs using a longer piece of timber than the stud spacing and gently tapping it along its entire length until you feel resistance from the timber studs. This ensures that the Celotex boards are evenly aligned with the wall surface.
In the UK, common stud wall timber frame sizes are typically either 75mm x 50mm or 100mm x 50mm. Therefore, for insulating walls made of timber frame construction, appropriate thicknesses of 75mm and 100mm are used. When using Celotex boards, they are flush with the timber frame surface on both sides, and it's generally unnecessary to use an air gap for partition walls. Celotex boards have a length of 2400mm, which is usually sufficient for cutting them along the length. If the wall is taller than 2.4m, the missing piece can be supplemented with another piece of Celotex board, and their joints sealed with aluminium tape.
Around sockets and switches, it's important to accurately cut the Celotex board and consider the space for electrical boxes. Electrical wires in such walls should be placed in PVC tubes to prevent overheating. Generally, when insulating timber frame construction with Celotex boards, it's recommended to angle the cuts at a slight angle of 5 degrees to facilitate fitting between studs. Any gaps should be filled with expanding foam, which will further strengthen their attachment to the timber frame. Once installed, the boards are ready for boarding on both sides.
HOW TO INSTALL CELOTEX CAVITY WALL INSULATION?
For nearly a century, constructing external walls in the UK has commonly involved building two layers of masonry, such as bricks or blockwork, with an air cavity in between. This method, known as a cavity wall construction, has been widely favoured. In a partial-fill masonry cavity wall, the gap between the two layers of masonry is only partially filled with PIR cavity board.
Cavity wall insulation boards typically come in dimensions of 450mm x 1200mm, which is closely related to the height of breeze blocks and the spacing of wall ties. Additionally, inserting insulation behind a brick wall deeper than 500mm would be extremely problematic. For partial fill insulation, Celotex CW4000 or Unilin XT/CW boards are commonly used.
In cavity wall construction, insulation boards are installed by placing them between the inner and outer leaf of the wall.
A segment of the inner leaf is constructed, with the initial row of wall ties spaced approximately 600mm horizontally, marking the starting point for insulation placement. Wall ties should avoid direct contact with the damp proof course (DPC).
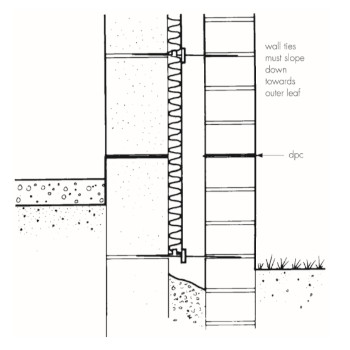
Pic. 1 Installation of wall ties
Picture credit:.bbacerts.co.uk
The primary leaf is raised to the desired height, with wall ties positioned vertically at 450mm intervals, ensuring tie drip is positioned midway across the residual cavity width. Excess mortar on the cavity face of the primary leaf is removed, and boards are installed on the wall ties behind retaining clips, forming a closely butt-jointed run.
A second row of wall ties secures the tops of the boards. It's crucial that all wall ties slope downward towards the outer leaf and are spaced no more than 900mm apart, ensuring each board is secured at a minimum of three points. Additionally, the first row of insulation boards should not touch the ground. For compliance with NHBC Standards, tie spacing should not exceed 600mm.
Boards should be closely butted together (for plain edge boards) or interlocked (for tongue-and-groove boards), with staggered vertical joints. Insulation boards and wall ties should be staggered during construction, extending to the wall's highest level unless protected by a cavity tray. Tongue-and-groove edge boards require slots to accommodate wall ties (including insulation retainers) to be cut into the top tongue.
After each section of the primary leaf is built, excess mortar is removed from the cavity face, and mortar droppings are cleaned from exposed board edges before the next run of boards is installed.
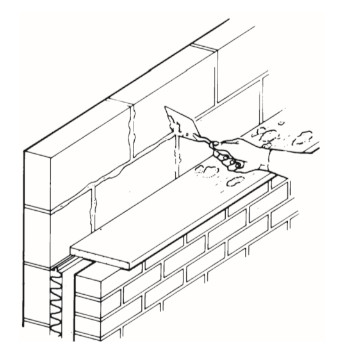
Pic.2 Cavity wall Celotex installation
Picture credit:.bbacerts.co.uk
The product features logos printed on the foil-facing on one side only. To optimise thermal performance, boards must be installed with the unprinted foil-face facing the cavity side.
For openings like doors and windows, it's advisable to use a continuous lintel or cavity tray in close proximity. Individual lintels or cavity trays should include stop ends and adequate drainage. Insulation boards should be precisely cut to fit snugly against cavity barriers, closers, and DPCs.
Boards can be cut using a sharp knife or fine-toothed saw to fit openings, windows, doors, and airbricks.
HOW TO INSTALL CELOTEX TO BRICK WALL?
In the UK, brick walls are a common sight, representing tradition and durability. However, they're not renowned for their warmth and can often feel cold and damp if uninsulated. To address this issue, Celotex boards are frequently used for insulation. There are two main methods for insulating brick walls: one involving timber or steel studs, and the other utilising the dot and dab method, which relies on adhesive. We've already discussed how to install Celotex in timber or steel frame construction, so let's now focus on the latter method called Dot&Dab.
HOW TO INSTALL CELOTEX WITH DOT AND DAB METHOD?
A brick wall can indeed be insulated using Celotex boards, provided you choose the right product range. This range has a slightly different structure: it consists of an insulation core attached to plasterboard on one side, while the reverse side is covered with paper to enhance adhesive contact. This type of Celotex board is known in the industry as insulated plasterboard, and Celotex offers a specific range called PL4000 for this purpose.
We've already covered how to install PIR boards using the Dot&Dab method. You'll find step-by-step instructions on how to do it. For more information click How To Dot & Dab Wall Insulation Boards.
HOW TO INSTALL CELOTEX CEILING INSULATION?
For ceiling insulation, Celotex boards are indeed suitable, but their installation requires great precision. As heat tends to rise, so do our expenses. Installing Celotex boards on the ceiling should ideally be done by someone with experience. However, if you choose to do it yourself, you should follow the following installation principles.
Insulating a ceiling with Celotex boards involves precise measurement, cutting, and placing of the cut pieces between the ceiling joists. You don't need many tools for this task; often, just a measuring tape, pencil, and hand saw for cutting is fine.
Measure the spacing between the timbers to get the smallest width. It's common for measurements to differ between points A and B, and even worse, they may vary within close proximity. Therefore, it's best to adopt the smallest possible measurement and fill the remaining insulation gaps with expanding foam, which will also reinforce the attachment of the boards to the timbers.
After accurately measuring the distance, transfer it onto the Celotex board and cut along this line at a slight angle of 5 degrees, making it easier to fit the board between the ceiling timbers. Seal each board joint with aluminium foil tape, with a minimum width of 75mm. Due to the natural curvature of the timber joists, it's recommended to cut small pieces of Celotex board to increase the accuracy of their connection with the timbers.
Properly cut boards should fit snugly between the ceiling timbers so that they don't fall out once installed. However, if they do have some gap on one side, they can be additionally secured with screws into the adjacent ceiling timbers. Nails are becoming less common for this purpose. Once the boards are properly cut and secured, they are ready for plasterboard boarding.
HOW TO INSTALL CELOTEX ROOF INSULATION?
Roof insulation is a critical aspect of home insulation and often requires the most attention during the insulation process, as about 30% of heat loss occurs through the roof. The most commonly chosen insulation material for roof insulation in the UK is undoubtedly Celotex.
Celotex boards have one of the lowest thermal conductivity values at 0.020W/mK. However, the main reason why Celotex boards are preferred for roof insulation is their surface covered with aluminium foil on both sides. This feature makes them incredibly effective at reflecting heat in roof insulation projects. Additionally, well-connected and taped boards can act as a vapour control layer.
Another reason why Celotex boards are commonly used for roof insulation is their thickness. Current building regulations require the use of 270mm insulation to achieve a U-value of 0.16W/m2K. Achieving such a low U-value is crucial, especially since roof constructions typically lack barriers other than the roof tiles themselves.
Celotex boards come in handy here. With them, you can achieve the desired U-value with a much thinner layer of insulation. To comply with these standards, you would need a minimum of 150mm of PIR insulation (with an R-value of 6.82m2K/W) as the initial layer.
Installing Celotex boards on the roof is similar to installing them between joists in the floor. While the technique is the same, there is one fundamental difference. It is a good practice to use a thinner layer of PIR as an additional insulation layer. The boards are installed perpendicular to the rafters and screwed directly to the roof rafters. The first layer of Celotex boards is then cut to fit the smallest dimension between the rafters, and any remaining gaps are filled with expanding foam. Once installed, these boards can even be covered with plasterboards.
Alternatively, if you prefer not to insulate the pitched roof and instead insulate only the attic floor, you can do so using Celotex boards. Depending on whether you intend to walk on this floor, the floor level is raised by the thickness of the Celotex insulation, which is then covered with 22mm chipboard. The method of installing the boards does not differ from their installation between rafters. It is essential to leave space for spotlights and additionally secure all cables to prevent them from heating up in the insulation.
For attic floor insulation, Celotex boards with a thickness of 100mm are often used as the first layer between the beams, followed by a thinner layer of 50mm insulation laid across them.
CONCLUSION
Celotex PIR boards are a highly popular and frequently chosen product. Their versatility makes them available in almost every store and ready for immediate use. Their installation is relatively simple and poses no health risk to the installer. Installing them between floor joists or in timber frame construction is almost identical to installing them between roof rafters. In each of these methods, it is essential to properly seal and avoid thermal bridging, with the best way to check for this being the use of a thermal imaging camera. With its imagery, you can be sure that the Celotex installation has been correctly installed, and any potential leak points can be easily located and repaired.
Related articles:
INSULATION THICKNESS ESSENTIALS
HOW TO CUT A PIR INSULATION BOARD?
HOW TO PROPERLY INSTALL INSULATION BETWEEN RAFTERS: A STEP-BY-STEP GUIDE
STEP-BY-STEP GUIDE: HOW TO INSTALL CELOTEX BOARD BETWEEN FLOOR JOISTS
MASTERING THE ART OF CUTTING CELOTEX AND KINGSPAN INSULATION BOARDS: TECHNIQUES, TOOLS, AND SAFETY
COMPARING ALTERNATIVES TO CELOTEX: ROCKWOOL, KINGSPAN, EPS, AND XPS POLYSTYRENE
FOIL INSULATION: TO GAP OR NOT TO GAP? THAT IS THE QUESTION!
*Insulationgo LTD strives to keep the content accurate and up-to-date, but we cannot be held responsible for any mistakes or exclusions.
The information in this blog isn't expert advice and shouldn't replace talking to the right specialists. Before buying or deciding anything based on this info, it's best to contact the product manufacturer directly to double-check if it's right for what you need.
Descriptions, drawings, photographs, data, proportions, weights, and measured values provided here may change without prior notice and do not establish the guaranteed contractual quality of the products. The recipient of these products holds the responsibility to comply with proprietary rights, existing laws, and legislation.
Using this blog implies acknowledgment and agreement that Insulationgo LTD cannot be held accountable for any damages, losses, or inconveniences resulting from the use or reliance upon the information provided. This limitation of liability extends to all users of the blog, including visitors, readers, and subscribers.
